Scenes combine the scene layers into finished screens that are presented by the Demorize Player as described in the overview in SectionĀ6.2, “Scene”. Scenes are shown in the Project view under the Scenes category.
Editing a scene is done by double clicking on the scene in the Project view or by selecting Properties from its context menu. This will open a dialog that presents the scene's parameters.
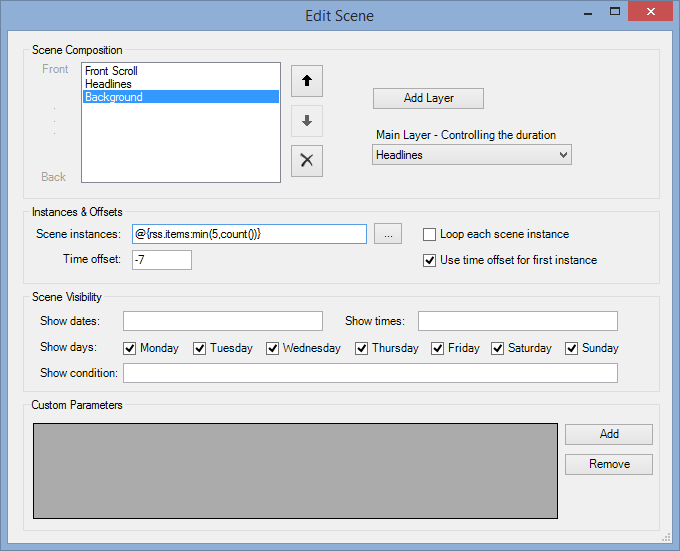
The scene composition settings allows the user to select which layers that the scene will present on the screen when shown by the Demorize Player. You must add at least one scene layer, but you may add as many as you like. The layers will be displayed on top of each other when presented by the Demorize Player.
One of the most important settings for a scene is the Main Layer setting. In this box you must select one of the scene layers that you have added to the composition list. You shall select the scene layer that shall control how long the scene shall be displayed. It is up to you to decide which layer that is in control of the timeline duration. The other layers will repeat their timeline playback if their timelines are shorter than the timeline of the layer you select as the main layer.
The Scene instances setting controls how many times the main layer shall be repeated each time the scene is shown by the Demorize Player. This parameter can be set to an integer, or to a reference to a data source item that evaluates to an integer, as shown in FigureĀ16.1, “Scene”
When the Loop each scene instance setting is checked, the time will loop at the end of the scene's timeline and start over at the beginning of the scene instance. This is used when you don't want the playback to automatically transition to the next scene or scene instance in the stream. The only way to exit this loop is to use Actions that jump to other bookmarks or scenes.
The Time offset setting controls how long delay, in seconds, that shall be introduced between each repetition of the main layer when the count is greater than one. Normally this parameter is used to create a bit of overlap between the scenes by specifying a negative time delay. If you do not want any overlap, this parameter can be set to zero. If the Use time offset for first instance is set to true, this time offset applies for the first occurrence of the scene as well, resulting in an overlap with the previous displayed scene.
The Use time offset for first instance setting can be set to true if you want to introduce a delay, positive or negative, to the first of the scene repetitions. Setting this parameter to false will only introduce the delay to repetitions of the scene when the count parameter is greater than one.
The Show dates, Show times and Show days settings can be used to define which specific periods you want the scene to be shown. If the dates and times fields are empty and all days are checked, the scene will always be shown. Here are some other examples of how to use these settings:
- Dates - Choose the date or dates you want the scene to be shown. This can be simple dates, like '1' for the first day every month or '1,7,21' for the first, 7th and 21st day every month. If you want, you can also specify a month. 1:st of June is for example specified as '1/6'. Even ranges are possible, like '1/1-31/3' for the first quarter of the year. Several dates or ranges can be added comma separated. Leave the field empty for no filtering on date.
- Times - Choose the times of the day you want the scene to be shown. This can be ranges, like '13-17' for the afternoon or more specific '13:30-16:45'. Several ranges can be added comma separated. Leave the field empty for no filtering on time.
- Days - Simply check the weekdays you want the scene to be shown or check all for no filtering on day.
The Show condition setting is another way to control when the scene is shown. Here you can enter a boolean Lua expression that will be evaluated. If the result is false, the scene will not be shown. If the field is left empty, it won't be evaluated and won't affect the scene.
There exists a scene index parameter that tells the current repetition of the main layer. A scene with a scene count greater than one will be repeated that many times and the index parameter is updated to reflect which of the repetitions that is currently playing. This can be used to dynamically decide which data from a data source to show at each of the repetitions, as shown in ExampleĀ16.1, “Example of usage of a scene parameter”.
ExampleĀ16.1.ĀThis is a complex use of the scene index parameter combined with a data source reference to lookup the Title text of an RSS feed data source called RssNews, based on the current scene repetition.
@{RssNews.items:Title[$(scene.index)]}
You may also add custom scene parameters that can be used by scene objects. This can be useful if you want to reuse scenes layer between different scenes but still want some objects in the layers to display different content in the different scenes. Custom scene parameters can be used in for example the text of a text object or as an index reference in a data item reference in a data source. Custom scene parameters are expressed with a syntax $(custom.parameter_name) when used, where parameter_name is replaced with the parameter that you want to use.