Table of Contents
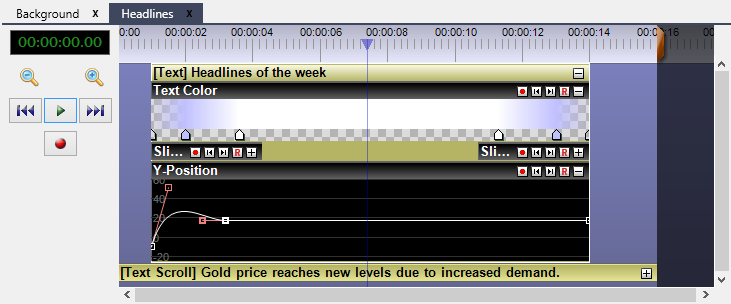
The timeline displays all objects in a scene layer as separate objects in the Timeline view, grouping all the property controllers for the object into the timeline object. This is seen as the yellow grouping box in Figure 17.4 which can be folded and unfolded in order to hide or show the object's property controllers. This folding is done by clicking the + and - button at the top right corner of the object's title bar on the timeline.
Figure 17.4. The timeline displays all the objects in a scene layer and the controllers that have been added for the objects' properties.

Inside an object on the timeline, there may be zero of more property controllers. These are seen as the black grouping boxes in Figure 17.4. These can be folded just as the object itself. Each of these property controllers control one or more of the object's properties over time. There are different editors for the different types of properties. For numerical properties you can draw curves that tell how the property shall change over time and for color properties you can instead place color keys that interpolate the color between the keys.
Besides these basic property controllers you can also make use of the pre-programmed controllers that are known as effects. These are programmed using the scripting functionality and are more high-level controllers with programmed behavior such as for example a slide in effect that moves an object from outside the screen to a position on the screen. They control the same properties as the normal property controllers but can control many of them at the same time with a pre-defined pattern.
![[Note]](images/note.png) | Note |
|---|---|
| Be cautious with combining pre-programmed effects with property controllers that control the same property as the effect since they will both try to control the same property. |
The length of the timeline is changed by right-clicking on the timeline bar and selecting Properties in the context menu. The scale of the timeline is changed by holding down the Ctrl button on the keyboard and scrolling the mouse wheel. This is useful when you need to get a better overview of the entire timeline or if you want to go in and work on details.
Property controllers are added from the context menu when right-clicking on the title bar of an object on the timeline. They are deleted from the context menu that is opened when right-clicking on the property controller's title bar.
Property controllers that make use of keys for control have a red recording button at the right on its title bar. This button adds a key frame at the current timeline cursor position for the selected property controller. These keys can be deleted by opening the context menu for the key by right-clicking on the key itself. Editing of a key's properties is done by selecting Properties in this same context menu.
The numeric property controller shows curves for how the value changes over time. The offset and scale of the curve view can be changed by using the scroll wheel of the mouse respectively holding down the Ctrl key on the keyboard and using the scroll wheel.
