Table of Contents
The Timeline View displays an activated scene layer and its objects on a timeline. The reason for having a timeline for layers is that the presentation of scenes is not static. A scene may change its look over time by either showing or hiding objects over time but also by changing properties of objects over time. An object property could for example be the position of an object on the screen, the color of a text or parameters of render filters, which is a way of creating advanced transition and rendering effects.
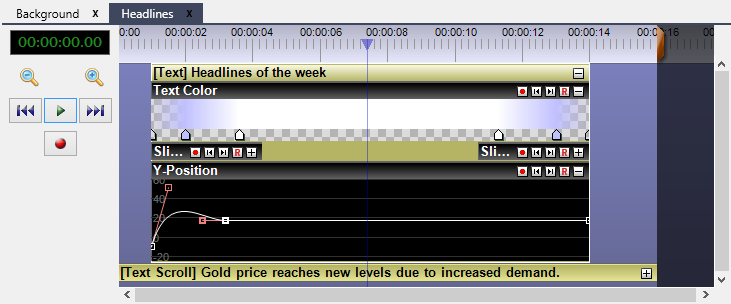
FigureĀ15.4.ĀThis timeline shows two activated layers named Background and Headlines where the later is the one that the user is currently editing.
New objects are added to the layer that currently has the focus, i.e. that is visible in the Timeline View. When an object is added it gets a default time span on the timeline. This time span can be changed by sizing the object on the timeline by clicking and dragging on one of the sides of the object heading. The object can also be moved in time by clicking and dragging the heading of the object.
Clicking the right mouse button on an object heading brings up a context menu for the object. In this menu you can bring up the properties for the object in the Properties View or you can add new parameter controllers that are used for manipulating object properties over time. Added parameter controllers are given a separate user interface that is found by clicking on the + button that is located to the right on the object heading. The black objects shown in FigureĀ15.4 are examples of the parameter user interfaces.
The length of the entire timeline is changed by either draging the end marker on the timeline bar or by entering a time in the properties for the timeline bar. Clicking the right mouse button on the timeline bar, that is located at the top of the Timeline View, brings up a context menu. In this context menu you can select to show the properties for the timeline. The properties are then shown in the Properties View.
How much of the timeline that is shown in the Timeline View can be changed by zooming in or out. This is done by holding down the Shift-key on the keyboard and scrolling the mouse wheel while the mouse pointer is located over the timeline, or simply by using the zoom buttons to the left of the timeline.
The current scene layer time, reflected by what is shown in the Screen View, is selected in the Timeline View by clicking the left mouse button on the timeline bar. This places the time cursor on the selected time.