Introduction
Blender is an outstanding, and completely free, program when it comes to rendering high quality 3D images. The integrated Cycles rendering engine provides physically based shading with global illumination that creates stunning visuals. Even though Cycles is able to calculate and render light caustics on its own, it is a time-consuming process to get the results are you looking for and to render the final images. It is even harder when modelling large areas such as swimming pools and beaches.
This tutorial will look into the process of using pre-calculated caustics textures to render things like swimming pools and beaches. When using caustics textures you can focus on the scene modelling instead of lighting setup to achieve good looking water.
What is caustics?
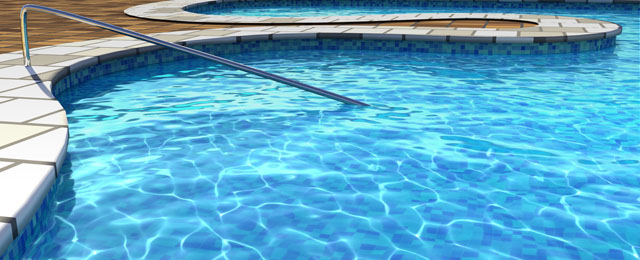
Caustics caused by water surfaces can be described as the dancing light pattern you see at the bottom of a pool on a sunny day. The light patterns that form on the bottom are caused by the refraction of light through the bumpy water surface. Since the water surface has smooth tiny waves, and the air to water transition of the light has a refraction index greater than one, there will be convergence of light where the light hits the bottom.
Calculating true caustics when rendering computer graphics is a rather time-consuming process so in order to speed up the rendering time you can fake it. The fake is performed by calculating a generic repeatable caustics pattern beforehand and store it in a texture. This texture is then used as a projected light-emitting property on the surfaces that we want to illuminate with caustics.
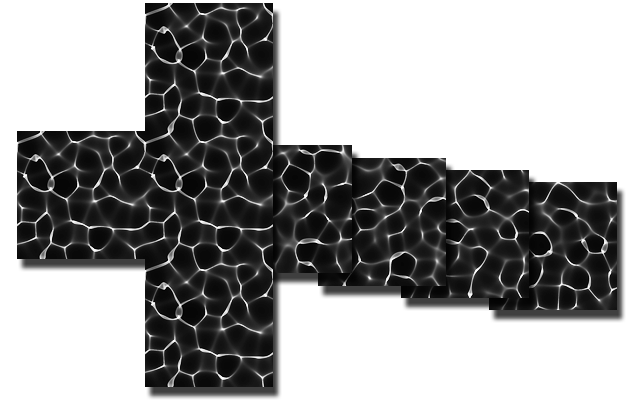
Faked caustics textures can be created with the Caustics Generator software. It creates textures that are seamlessly repeatable both horizontally and vertically, which means that they can be tiled over infinite areas. The software also creates animated caustics as a series of images. This means that you can repeat them in an infinite playback loop.
How to use caustics textures with Cycles in Blender
The reason why we are using the Cycles rendering engine in Blender is because of its good support for node-based materials.
Using Nodes for our material provides us the opportunity to create a very custom material where the caustics texture can be added as a light emitting property on top of any other shading that we want to have on the objects.
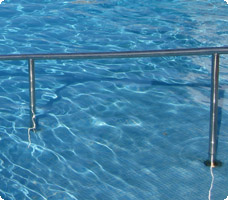
We are combining two Shaders in our example; one Shader performing the brick tile material for the pool walls and floor, and a second Shader that provides an added light emission using a caustics texture that is mapped onto the surfaces.
I'm not going to explain every detail of the Blender setup in this tutorial but is going to focus on the essentials to get started with using caustics textures. The entire Blender project is available as a download at the bottom of this page, allowing you to take a deeper look at it yourself.
Using Nodes in Blender
If you haven’t used Nodes in Blender before it might seem a bit difficult. Nodes is however a very powerful concept when working with complex materials since it gives you the freedom to create custom designed shading pipelines. This allows you to combine materials and their properties in more detail than just using the standard material setup.
You turn a material into a Node material by switching to the Node Editor in the view and then check the Use Nodes checkbox for the currently selected material.

Creating the tiled brick material
To get comfortable with using the node editor we are first taking a look at how to create the tiled brick material that is covering the inside of the pool.
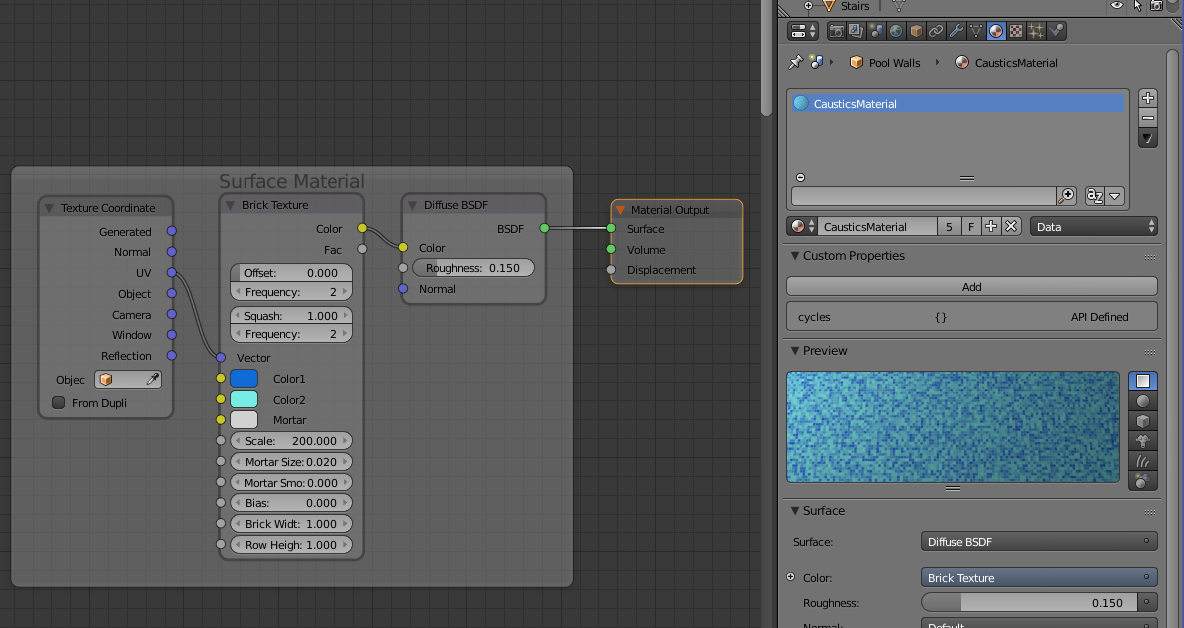
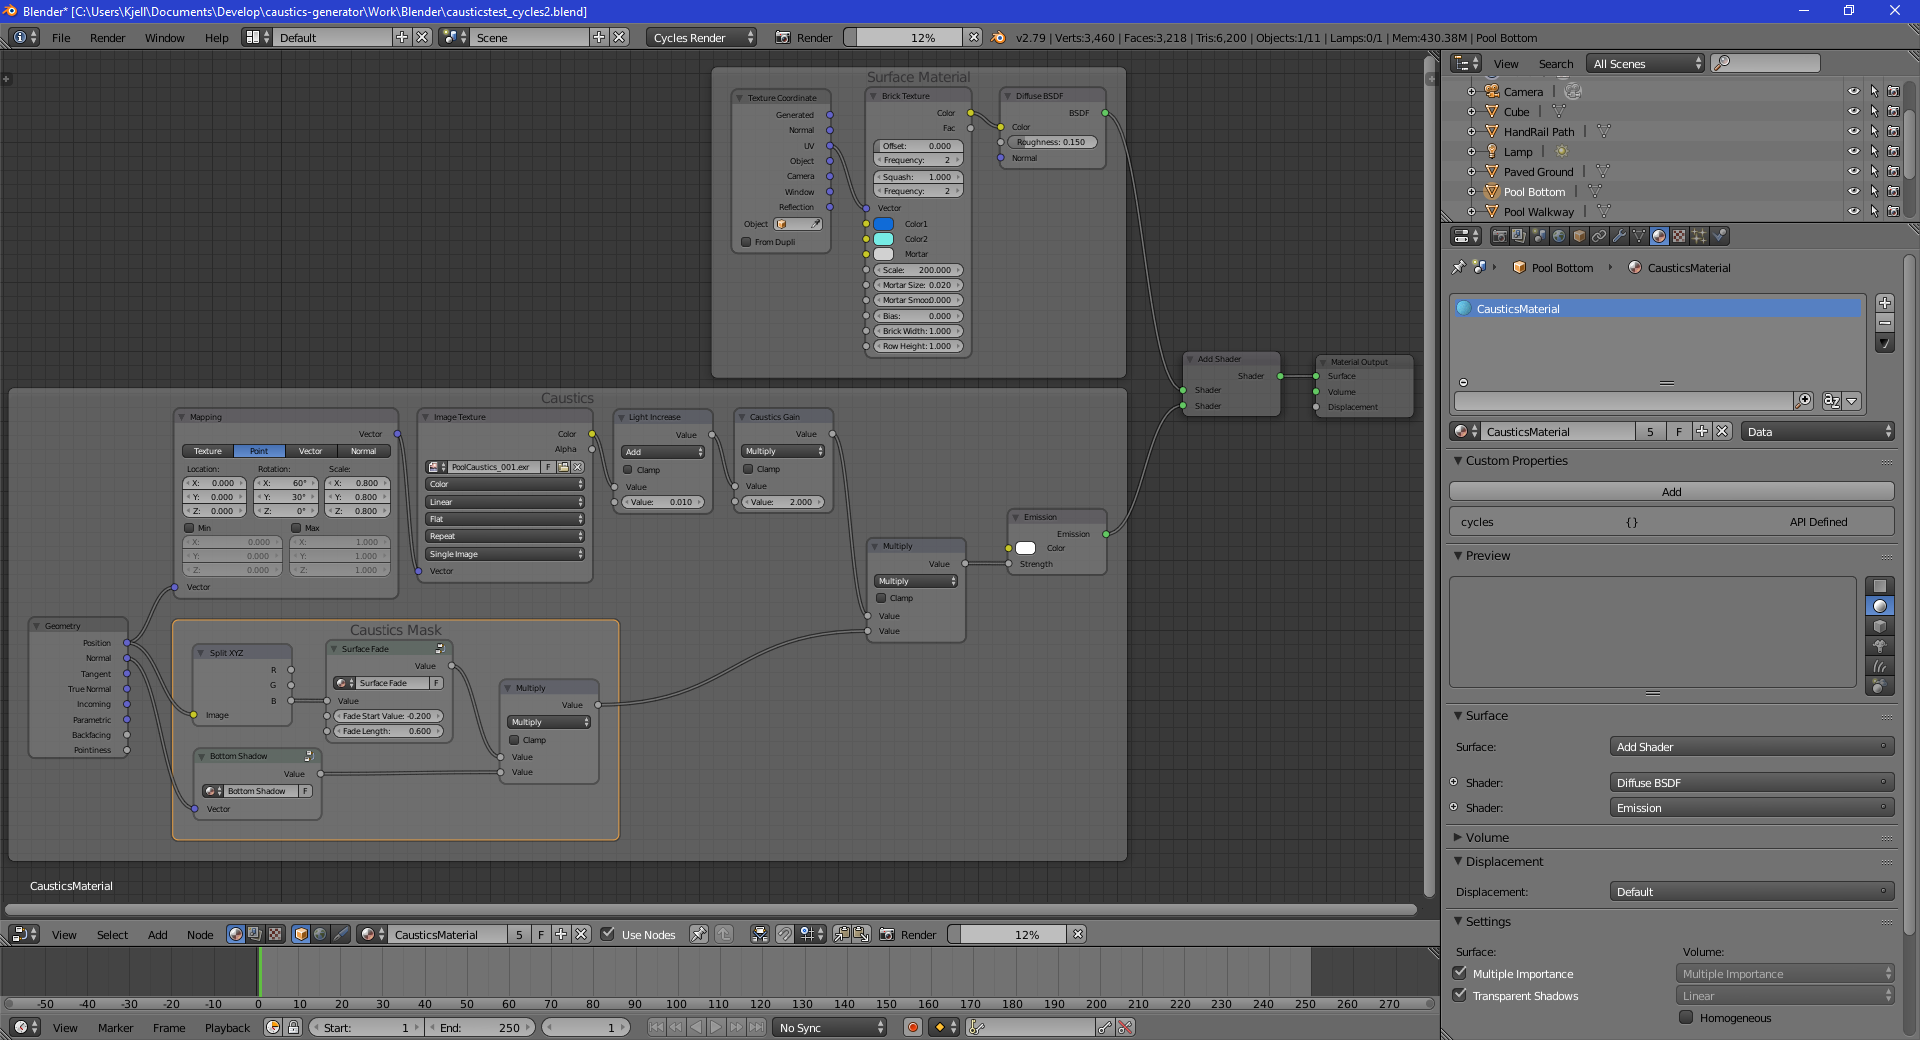
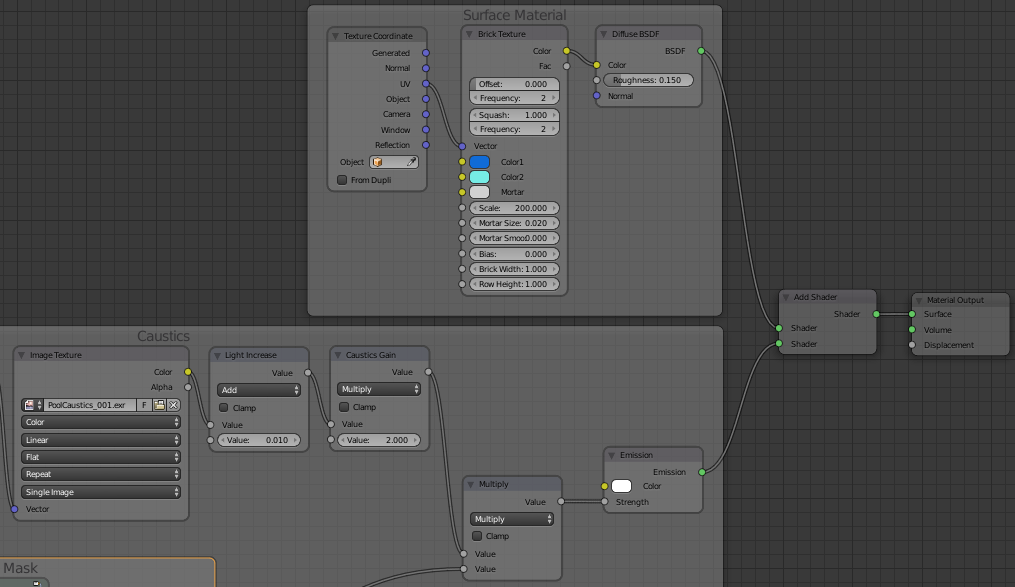
In the picture above you can see that the material consists of four nodes. Three nodes that define the material and a fourth to the right that is the output. In this example we are not yet using caustics textures so we have connected the output from the material directly to the Material Output node, which we will change later. This entire surface material could have been created without using a Node material but since we are going to combine it with the caustics later we have to make it in the Node editor as well.
From the left we have the Texture Coordinate node that extracts the UV mapping coordinates of the object to which the material is applied. The UV coordinate of the surface location that is being rendered, or Texel coordinate as it is called, is then passed to the Brick Texture node which create a colored pattern of tiles. This is a procedural texture node, which means that the pixel color value at each texture coordinate is defined mathematically instead of using an image texture file. The color of the texel is passed to the Diffuse BSDF node which performs the lighting and surface shading before it is sent as an output to the material.Adding caustics texturing to a material
We are now going to dive into the interesting stuff with rendering the caustics texture as light pattern onto the surface of objects.
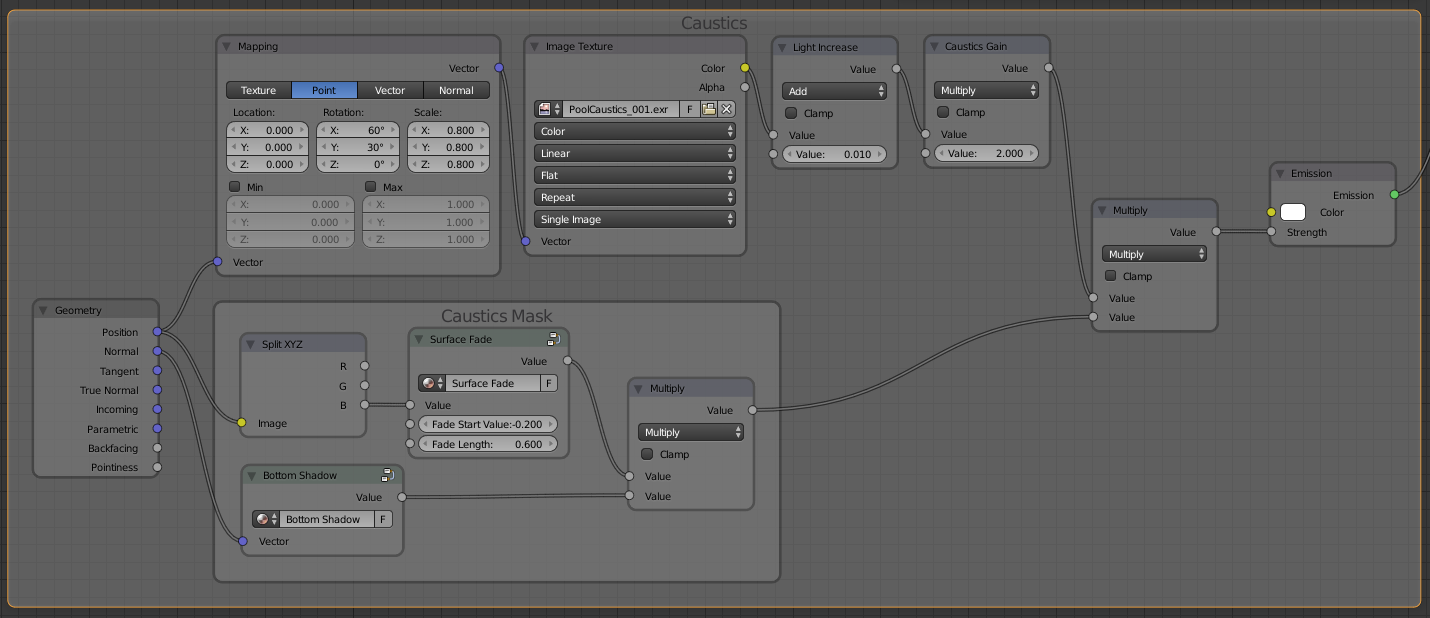
The caustics texturing is provided by the top nodes of the node graph shown in the above picture. The bottom part of the node graph provides a masking and fading of what parts of objects that shall be affected by the caustics texturing, which we will go through later. To the right in the node graph we are multiplying the mask with the texturing and then providing the result through an Emission node. The Emission node provides the light emission intensity for the currently calculated surface location to the outside material shading and thus lights up pixels where the caustics texture has brighter spots.
 In difference to the brick material we defined in the previous chapter, this caustics texturing does not use the UV texture coordinates of objects. The texture mapping is instead using a Mapping node that provides a world oriented planar mapping that is somewhat tilted around the X- and Y-axis, as a simulation of the sun angle. The reason for this mapping is that we want a projection of the texture onto surfaces as if it was projected by a distant light source.
The Image Texture node provides the caustics texture with a Repeat option so that it tiles infinitely. We have selected to use a high dynamic range caustics texture in EXR format in order to provide better intensity dynamic to our emission shading.
The Light Increase and Caustics Gain nodes are just simple Math nodes that provide a way to increase the overall lightness and dynamic range on surfaces affected by caustics.
Masking where caustics shall be visible
The Caustics Mask area contains two complex node graphs that have been grouped together into own separate node graphs. These are actually just mathematical formulas that are abstracted away. Grouping nodes is just a way to abstract away details from the top view. A group can provide bindable variables that can be bound to by the outside graph in an easy to understand way.
 The Surface Fade group provides a top down fading in world coordinates of what parts of the object that shall show caustics patterns. Think of this as anything that is above the water surface shall not show any caustics on it and the bottom of the pool shall show full amount of caustics. In between, e.g. on the walls of the pool, the caustics will fade and be more and more visible the deeper below the water surface that we get.
 The Bottom Shadow group provides the opposite to the Surface Fade group. It removes caustics from the surfaces that are pointing downwards in the world. This sub graph is only needed if you want to have objects floating around inside the water. Those objects shall not show any caustics on their bottom since the sun rays do not reflect onto those parts.
Combining shaders
Finally we have our two shaders that provide the surface coloring and the light caustics. The final step is to connect these two together for our complete material shading. This is done with an Add Shader node that blends the two shaders together.
Summary
Adding caustics to renderings of swimming pools and water bays really adds that final touch that makes it look real. This tutorial has only shown how to use static images but once you start animating it you really get that real feeling of water and warm summer. The complete Blender project used in this tutorial is available for download below. Please feel free to take inspiration or extract parts of it into your own projects.
 Download complete Blender project